Google Test Lab
“Firebase Test Lab is a cloud based app-testing infrastructure. With one operation, you can test your android or iOS app across a wide variety of devices and device configurations, and see the results—including logs, videos, and screenshots—in the Firebase console” – https://firebase.google.com/docs/test-lab/
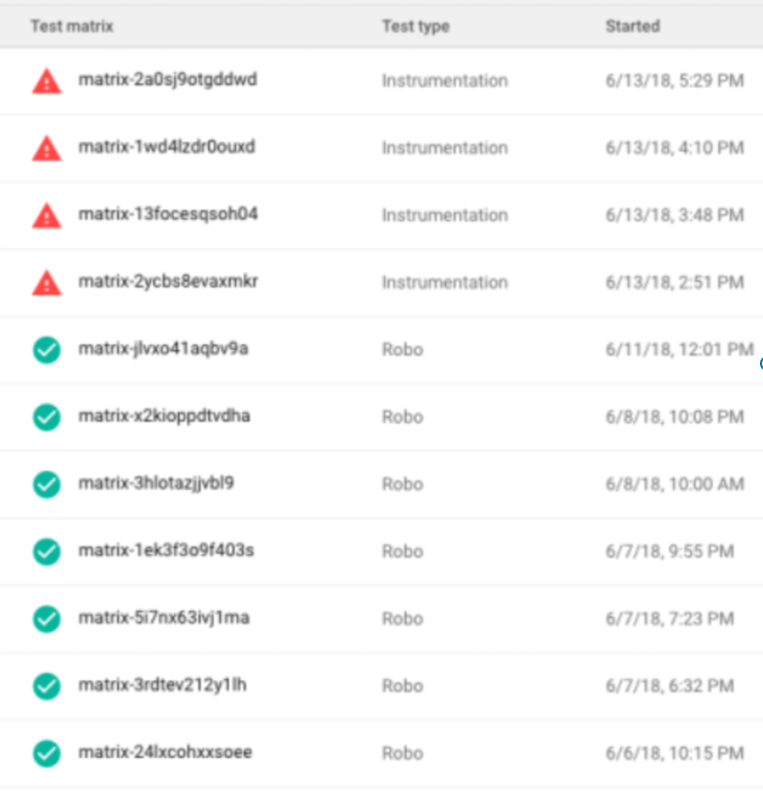
Test Matrix
Key capabilities

Google Test Lab – Robo Testing
Robo test is a test tool that is integrated with Firebase Test Lab. Robo test analyzes the structure of your app’s UI and then explores it methodically, automatically simulating user activities. Unlike the UI/ Application Exerciser Monkey test, Robo test always simulates the same user activities in the same order when you use it to test an app on a specific device configuration with the same settings. This lets you use Robo test to validate bug fixes and test for regressions in a way that isn’t possible when testing with the UI/Application Exerciser Monkey test.
Robo test captures log files, saves a series of annotated screenshots, and then creates a video from those screenshots to show you the simulated user operations that it performed. These logs, screenshots, and videos can help you to determine the root cause if your app crashes, and can also help you to find issues with your app’s UI.
Activity map from one of my products

Google Test Lab – Instrumented Testing
When running with instrumentation turned on, this class will be instantiated for you before any of the application code, allowing you to monitor all of the interaction the system has with the application. An Instrumentation implementation is described to the system through an AndroidManifest.xml’s <instrumentation> tag” – https://developer.android.com/reference/android/app/Instrumentation
Instruction testing is located at module-name/src/androidTest/java/
These are tests that run on a hardware device or emulator. These tests have access to Instrumentation APIs, give you access to information such as the Context of the app you are testing, and let you control the app under test from your test code. Use these tests when writing integration and functional UI tests to automate user interaction, or when your tests have Android dependencies that mock objects cannot satisfy.” – https://developer.android.com/studio/test/
Activities Lifecycle – https://developer.android.com/guide/components/activities/activity-lifecycle

Instrumented Testing – Android

AndroidJUnitRunner – https://developer.android.com/reference/android/support/test/runner/AndroidJUnitRunner
Your project’s (1) instrumented tests and (2) local JVM tests are visible in either the Project view (left) or Android view (right)

Espresso Testing
• What is Espresso?
• From the Google Android developer site: “The Espresso testing framework provides a set of APIs to build UI tests to test user flows within an app. These APIs let you write automated UI tests that are concise and that run reliably. Espresso is well-suited for writing white box-style automated tests, where the test code utilizes implementation code details from the app under test.”
• From the Appium introduction page: “Appium is an open-source tool for automating native, mobile web, and hybrid applications on iOS and Android platforms. Native apps are those written using the iOS, Android, or Windows SDKs. Mobile web apps are web apps accessed using a mobile browser […]. Hybrid apps have a wrapper around a “webview”—a native control that enables interaction with web content.”
• Why is Espresso (vs. Appium)? – https://saucelabs.com/blog/appium-vs-espresso
• Espresso is inside the application, and is written by Google for the sole purpose of functional testing of an Android UI. In terms of testing style, the Espresso description mentions “white box testing.” As Espresso is inside the application, it has access to and knows how to use the code that actually runs the application for more thorough testing of each element.
• Appium is designed to be a cross-platform test platform. As such, one of the trade-offs focuses on “black box testing” which only tests what has been exposed externally to the application. Using the Android UIAutomator framework, Appium can access all the UI elements that a user will see. Two of the benefits of being external to the application are the ability to validate the data going to and from the service layer behind the scenes, and the ability to execute simulations by telling the app the device has rotated, or that the home button has been pushed.
• Espresso
• It provides automatic synchronization of test actions with the UI of the app you are testing • It has access to UI objects’ internals, it can test WebView, i.e. hybrid applications
• Integrated with Android Studio
• It can test only one application at a time, and doesn’t have access to device resources, say, notifications, turn on/off wifi
• However, this could be easily solved by creating combined tests with UI Automator – https:// qathread.blogspot.com/2015/05/espresso-uiautomator-perfect-tandem.html
• UIAutomator
• Its key features include cross-app functional testing, the ability to test multiple apps, and switch between installed and system apps
• It is a black-box testing tool (i.e., a test developer doesn’t need to know the internal app structure and can rely entirely on visible UI elements)
• It doesn’t support WebView, upon which hybrid Android apps are built. Therefore, UI Automator supports only native Android apps
Code snippet

• espresso-core – Contains core and basic View matchers, actions, and assertions. See Basics and Recipes.
• espresso-web – Contains resources for WebView support.
• espresso-idling-resource – Espresso’s mechanism for synchronization with background jobs.
• espresso-contrib – External contributions that contain DatePicker, RecyclerView and Drawer actions, accessibility checks, and CountingIdlingResource.
• espresso-intents – Extension to validate and stub intents for hermetic testing.
• espresso-remote – Location of Espresso’s multi-process functionality.
Code Snippet

Espresso Testing recorder

Code Quality – SonarQube
• SonarQube (formerly Sonar) is an open source platform developed by SonarSource for continuous inspection of code quality to perform automatic reviews with static analysis of code to detect bugs, code smells, and security vulnerabilities on 20+ programming languages. SonarQube offers reports on duplicated code, coding standards, unit tests, code coverage, code complexity, comments, bugs, and security vulnerabilities.
• SonarQube can record metrics history and provides evolution graphs. SonarQube’s provides fully automated analysis and integration with Maven, Ant, Gradle, MSBuild and continuous integration tools (Atlassian Bamboo, Jenkins, Hudson, etc.).
• Centralize Quality
• One place to provide a shared vision of code quality for developers, tech leads, managers and executives in charge of a few to a few thousands projects and also to act as a toll gate for application promotion or release.
• Continuous Inspection
• SonarQube provides the capability to not only show health of an application but also to highlight issues newly introduced. With a Quality Gate in place, you can fix the leak and therefore improve code quality systematically.
• Detect Tricky Issues
• Sonar code analyzers are equipped with powerful path sensitive dataflow engines to detect tricky issues such as null-pointers dereferences, logic errors, resource leaks…
• DevOps Integration
• SonarQube integrates with the entire DevOps toolchain including build systems, CI engines, promotion pipelines… using webhooks and its comprehensive RestAPI.
Code Quality – SonarQube – Centralize Quality

Code Coverage
• Code coverage analysis is the process of:
• Finding areas of a program not exercised by a set of test cases, • Creating additional test cases to increase coverage, and
• Determining a quantitative measure of code coverage, which is an indirect measure of quality.
• An optional aspect of code coverage analysis is:
• Identifying redundant test cases that do not increase coverage.
• Testing pass rate is NOTHING without CC 
• Instrumented Testing (from Espresso Testing result)
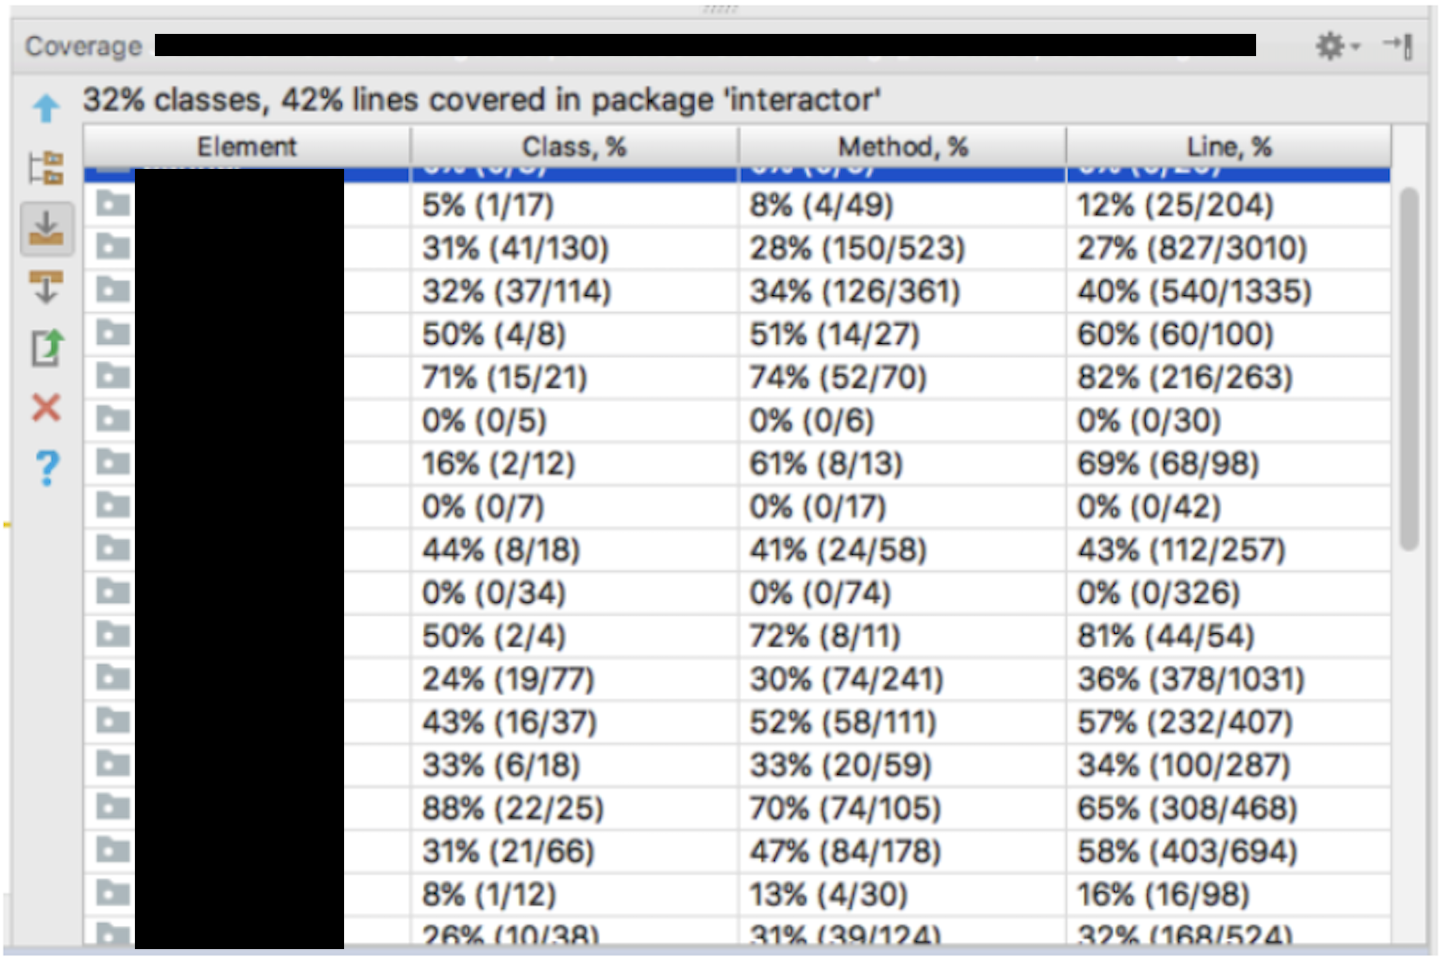
Code Coverage – Key Metrics
• Statement Coverage
• This metric reports whether each executable statement is encountered. Declarative statements that generate executable code are considered executable statements. Control-flow statements, such as if, for, and switch are covered if the expression controlling the flow is covered as well as all the contained statements. Implicit statements, such as an omitted return, are not subject to statement coverage. Also known as: line coverage
• Function (Method) Coverage
• This metric reports whether you invoked each function or procedure. It is useful during preliminary testing to assure at least some coverage in all areas of the software. Broad, shallow testing finds gross deficiencies in a test suite quickly
• Class Coverage
• https://www.bullseye.com/coverage.html
Code Coverage – How it works – Cont’d
Java Compiled Code

Code Coverage in Android Studio